Aug 11, 2016

Basic SSIS

Mainly used for ETL (Extract Transform Load) implementation. Consider an Example of loading data from a flat file to DB.

Start SQL Server Data Tools for Visual Studio (Community edition in my case)


In this blog we will simply load data from one csv file to DB. We will use file available from Indian stock market called Bhavcopy which gives data about stokes for a day. I am using file available here

Create new project in tool as File à New à Project (Ctrl + Shift +N). Select integration Services Project


Give a name to this project (in my case TestStockPriceLoad) and Click OK. 


Now we will need to connect to two endpoints one for source (Flat file) and another for target (SQLServer DB). Here we have two favourite task

  • Data flow task 
  • Execute SQL task

Since we want to transfer data from Source to Destination we are selecting Data flow task. Later in this article we will use Execute SQL task to clean data in temporary table before we load data from flat file. So first thing first we create Data Flow Task by dragging it in Package design window from SSIS Toolbox pan.


Now we create Connection Managers to be used in Data Flow Task. So right click on Connection Managers and select New Connection Manager.


Select FLATFILE from options and click Add button.


Give appropriate name for this connection manager and select File location.


Then click to Columns option, it will show you what data is there in CSV file. Since we do not want to change anything in this case we will simply click Ok 

Now before we create connection manager for target we create a table to store values. For this tutorial we want to load only first 4 columns so we create table with following SQL query.

CREATE TABLE [dbo].[TMP_SCRIP_NSE](
[SCRIP_CODE] [varchar](15) NOT NULL,
[SCRIP_NAME] [varchar](50) NOT NULL,
[SCRIP_GROUP] [varchar](3) NOT NULL,
[SCRIP_TYPE] [varchar](3) NOT NULL
)

Now by following similar steps we create Connection Manager for OLEDB and select table created in last step.

Now double click on Data Flow Task and it will take you to Data Flow tab (alternately click on Data Flow Tab directly).

In this tab from SSIS Tool box panel drag "Flat File Source" to Data Flow tab and similarly drag and drop "OLE DB Destination".


It will show error and that we will fix in next step. Double click on Flat File Source and go to Columns and simply close it as we do not want to change anything for now. Once done it will Red error icon will disappear from Source block. Now drag Blue arrow from source and connect it to destination.


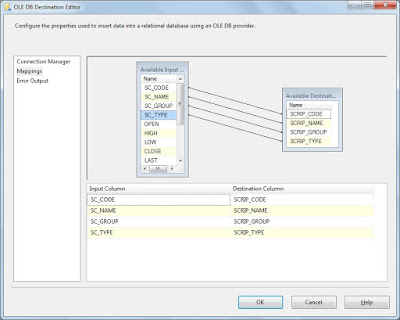
Now double click on target and from "Name of the table or the view" drop down select table we created previously.

Click on Mappings and map source and target columns as shown.


This will give a warning regarding truncation as source has all default column width. In order to remove this again go to CSV Connection Manager and set width in Advanced tab as follows.


When you try to save these changes it will ask you if you want to update metadata. Select Yes and save the project. Upon Saving the project Warning will go away.

Now run this package either by clicking F5 or by clicking on Start button.


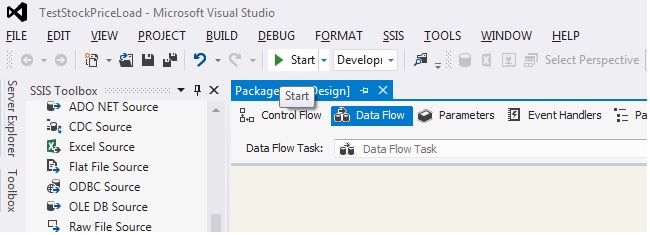
It will build and run the project and show results as shown below.


Alternately you can run SQL query in SQL Server Management Studio and verify if data is loaded correctly or not.

Jul 7, 2016

Basic Spark operations

Here are few basic spark operations like filtering, grouping etc.
import org.apache.spark.SparkConf
import org.apache.spark.SparkContext
import org.apache.spark.sql.SQLContext
object MySQLSpark {
def main(args: Array[String]): Unit = {
println("Testing MySQL Connection from Spark")
System.setProperty("hadoop.home.dir", "D:/sw/hadoop/hadoop-common-2.2.0-bin-master/");
val cfg = new SparkConf();
cfg.setMaster("local").setAppName("Spark MySQL Example in Scala");
val ctx = new SparkContext(cfg);
val sqlCtx = new SQLContext(ctx);
val orderDF = sqlCtx.read.format("jdbc").option("url", "jdbc:mysql://localhost/northwind")
.option("driver", "com.mysql.jdbc.Driver")
.option("dbtable", "orders").option("user", "root").option("password", "").load()
val customerDF = sqlCtx.read.format("jdbc").option("url", "jdbc:mysql://localhost/northwind")
.option("driver", "com.mysql.jdbc.Driver")
.option("dbtable", "customers").option("user", "root").option("password", "").load()
orderDF.select("id", "employee_id","customer_id","ship_name","order_date","shipper_id").filter("order_date is not null").filter("shipper_id = 2").limit(5).show()
orderDF.filter("order_date is not null").filter("shipper_id = 2").groupBy("ship_state_province").count().show()
orderDF.join(customerDF,orderDF("customer_id") === customerDF("id")).show();
}
}
Ensure following is set in argument
-Xms128m -Xmx512m

Jun 28, 2016

Scala code for Twitter Stream reader with Apache Spark

Following is the code that finally worked for me. It reads twit containing word Brexit and saves information in file.

import org.apache.spark.SparkConf
import org.apache.spark.SparkContext
import twitter4j.conf.ConfigurationContext
import twitter4j.auth.AuthorizationFactory
import org.apache.spark.streaming.twitter.TwitterUtils
import org.apache.spark.streaming.StreamingContext
import org.apache.spark.streaming.Seconds
import org.apache.spark.storage.StorageLevel
import twitter4j.auth.Authorization
object Main {
val CONSUMER_KEY = "";
val CONSUMER_SECRET = "";
val ACCESS_TOKEN_KEY = "";
val ACCESS_TOKEN_SECRET = "";
def main(args: Array[String]) {
System.setProperty("hadoop.home.dir","D:/sw/hadoop/hadoop-common-2.2.0-bin-master/");
System.setProperty("spark.driver.allowMultipleContexts", "true");
System.setProperty("twitter4j.oauth.consumerKey", CONSUMER_KEY);
System.setProperty("twitter4j.oauth.consumerSecret", CONSUMER_SECRET);
System.setProperty("twitter4j.oauth.accessToken", ACCESS_TOKEN_KEY);
System.setProperty("twitter4j.oauth.accessTokenSecret", ACCESS_TOKEN_SECRET);
val cfg = new SparkConf();
cfg.setMaster("local[*]").setAppName("Spark Streaming Example in Scala");
val ctx = new SparkContext(cfg);
val ssc = new StreamingContext(cfg,Seconds(30));
val twitterConfig = ConfigurationContext.getInstance();
val twitterAuth = AuthorizationFactory.getInstance(twitterConfig);
val filters = Seq("Brexit");
val stream = TwitterUtils.createStream(ssc, None,filters,StorageLevel.MEMORY_AND_DISK_2).repartition(10);
val tagEntities = stream.flatMap { x => Seq(x.getUser,x.getText,x.getId)}
tagEntities.saveAsTextFiles("D:/keyur/tech/data/spark/twitter-stream/", "")
//stream.filter { x => x.getText.contains("China") }.map { x => (x.getId,x.getText) }.saveAsTextFiles("D:/keyur/tech/data/spark/twitter-stream/", "")
ssc.start()
ssc.awaitTermination()
ssc.stop(true)
if(ctx!=null)
ctx.stop()
}
}
view raw Main.scala hosted with ❤ by GitHub
So something more serious, may be later.

Jun 26, 2016

Spring Batch with Spring integration

One way is explain in Spring Documents but if we want greater control and if customizations are required following another way.

In this blog we want to achive following.

At a high level

  • File inbound-channel-adapter will poll directory for any new file. If a new file comes in this folder then it will pass it to Transformer
  • Transformer will accept File as an input and Transform it to JobParameters (with file name as input-file parameter) and Pass it to Service Activator.
  • Service Activator will fetch the Job and JobLauncher object and execute the job and passes results to next end point
  • In this case next end point is again a Service activator which will simply print the status message. In real scenario this can be replaced by email or MQ or DB operation.
Following is Spring configuration
<beans xmlns="http://www.springframework.org/schema/beans"
xmlns:jdbc="http://www.springframework.org/schema/jdbc" xmlns:xsi="http://www.w3.org/2001/XMLSchema-instance"
xsi:schemaLocation="http://www.springframework.org/schema/beans
http://www.springframework.org/schema/beans/spring-beans.xsd
http://www.springframework.org/schema/jdbc
http://www.springframework.org/schema/jdbc/spring-jdbc.xsd">
<import resource="bhavcopy-job.xml" />
<import resource="spring-int-context.xml"/>
<bean id="dataSource"
class="org.springframework.jdbc.datasource.DriverManagerDataSource">
<property name="driverClassName" value="com.mysql.cj.jdbc.Driver" />
<property name="url" value="jdbc:mysql://localhost:3306/techrefresh?useSSL=false" />
<property name="username" value="root" />
<property name="password" value="" />
</bean>
<bean id="transactionManager"
class="org.springframework.batch.support.transaction.ResourcelessTransactionManager" />
<jdbc:initialize-database data-source="dataSource">
<jdbc:script location="org/springframework/batch/core/schema-drop-mysql.sql" />
<jdbc:script location="org/springframework/batch/core/schema-mysql.sql" />
</jdbc:initialize-database>
</beans>
Follwoing is Batch job configuration
<beans xmlns="http://www.springframework.org/schema/beans"
xmlns:batch="http://www.springframework.org/schema/batch" xmlns:xsi="http://www.w3.org/2001/XMLSchema-instance"
xsi:schemaLocation="http://www.springframework.org/schema/batch
http://www.springframework.org/schema/batch/spring-batch.xsd
http://www.springframework.org/schema/beans
http://www.springframework.org/schema/beans/spring-beans.xsd
">
<batch:job-repository />
<bean id="jobLauncher"
class="org.springframework.batch.core.launch.support.SimpleJobLauncher">
<property name="jobRepository" ref="jobRepository" />
</bean>
<batch:job id="titanicJob">
<batch:step id="flatfileread">
<batch:tasklet>
<batch:chunk reader="itemReader" writer="itemWriter"
commit-interval="5">
</batch:chunk>
</batch:tasklet>
</batch:step>
</batch:job>
<bean id="itemReader" class="org.springframework.batch.item.file.FlatFileItemReader"
scope="step">
<property name="resource" value="#{jobParameters['input.file']}" />
<property name="lineMapper">
<bean class="org.springframework.batch.item.file.mapping.DefaultLineMapper">
<property name="lineTokenizer">
<bean
class="org.springframework.batch.item.file.transform.DelimitedLineTokenizer">
<property name="names"
value="SC_CODE,SC_NAME,SC_GROUP,SC_TYPE,OPEN,HIGH,LOW,CLOSE,LAST,PREVCLOSE,NO_TRADES,NO_OF_SHRS,NET_TURNOV,TDCLOINDI" />
</bean>
</property>
<property name="fieldSetMapper">
<bean class="com.techrefresh.spring.batch.mapper.ScriptPriceFieldMapper"/>
</property>
</bean>
</property>
<property name="strict" value="false" />
</bean>
<bean id="itemWriter" class="org.springframework.batch.item.file.FlatFileItemWriter"
scope="step">
<property name="resource" value="#{jobParameters['output.file']}" />
<property name="lineAggregator">
<bean
class="org.springframework.batch.item.file.transform.DelimitedLineAggregator">
<property name="delimiter" value="," />
<property name="fieldExtractor">
<bean class="org.springframework.batch.item.file.transform.BeanWrapperFieldExtractor">
<property name="names" value="scripCode,scripName,scripGroup,scripType" />
</bean>
</property>
</bean>
</property>
</bean>
</beans>
Following is Spring Integration configuration file.
<?xml version="1.0" encoding="UTF-8"?>
<beans xmlns="http://www.springframework.org/schema/beans"
xmlns:xsi="http://www.w3.org/2001/XMLSchema-instance" xmlns:int="http://www.springframework.org/schema/integration"
xmlns:int-jms="http://www.springframework.org/schema/integration/jms"
xmlns:int-file="http://www.springframework.org/schema/integration/file"
xsi:schemaLocation="http://www.springframework.org/schema/beans http://www.springframework.org/schema/beans/spring-beans.xsd
http://www.springframework.org/schema/integration http://www.springframework.org/schema/integration/spring-integration.xsd
http://www.springframework.org/schema/integration/jms http://www.springframework.org/schema/integration/jms/spring-integration-jms.xsd
http://www.springframework.org/schema/integration/file http://www.springframework.org/schema/integration/file/spring-integration-file.xsd">
<int:channel id="msgPrintChannel" />
<int:channel id="batchJobChanel" />
<int:channel id="xmer" />
<int-file:inbound-channel-adapter directory="D:/keyur/tech/data/batch" channel="xmer" />
<int:transformer input-channel="xmer" output-channel="batchJobChanel" ref="xmerBean" method="buildJobParams"/>
<int:service-activator input-channel="batchJobChanel" ref="jobExecutor" method="executeJob" output-channel="msgPrintChannel"/>
<int:service-activator input-channel="msgPrintChannel" ref="util" method="printMsg" requires-reply="false"/>
<bean id="xmerBean" class="com.techrefresh.spring.batch.integration.xmer.JobParamXmer" />
<bean id="jobExecutor" class="com.techrefresh.spring.batch.JobExecutor">
<property name="jobLauncher" ref="jobLauncher"/>
<property name="titanicJob" ref="titanicJob"/>
</bean>
<bean id="util" class="com.techrefresh.spring.batch.util.Utility" />
<int:poller fixed-rate="100" id="defaultPoller" default="true" />
</beans>


Following will be output.

2016-06-27 00:14:02 INFO  FileReadingMessageSource:264 - Created message: [[Payload File content=D:\keyur\tech\data\batch\EQ180516.CSV][Headers={id=97667554-4582-7f7e-7659-18da2ba536a1, timestamp=1466957642760}]]
2016-06-27 00:14:02 INFO  JobParamXmer:13 - Will create parameters for file at D:\keyur\tech\data\batch\EQ180516.CSV
2016-06-27 00:14:02 INFO  JobExecutor:42 - Launcher org.springframework.batch.core.launch.support.SimpleJobLauncher@129d348, Job FlowJob: [name=titanicJob]
2016-06-27 00:14:02 INFO  JobExecutor:44 - Executing batch job {input.file=D:\keyur\tech\data\batch\EQ180516.CSV, output.file=file://D:/keyur/tech/data/titanic/out.csv}
2016-06-27 00:14:03 INFO  SimpleJobLauncher:133 - Job: [FlowJob: [name=titanicJob]] launched with the following parameters: [{input.file=D:\keyur\tech\data\batch\EQ180516.CSV, output.file=file://D:/keyur/tech/data/titanic/out.csv}]
2016-06-27 00:14:03 INFO  SimpleStepHandler:146 - Executing step: [flatfileread]
2016-06-27 00:14:03 WARN  FlatFileItemReader:253 - Input resource does not exist class path resource [D:/keyur/tech/data/batch/EQ180516.CSV]
2016-06-27 00:14:03 INFO  SimpleJobLauncher:136 - Job: [FlowJob: [name=titanicJob]] completed with the following parameters: [{input.file=D:\keyur\tech\data\batch\EQ180516.CSV, output.file=file://D:/keyur/tech/data/titanic/out.csv}] and the following status: [COMPLETED]
2016-06-27 00:14:03 INFO  Utility:10 - Logging message SUCCESS

Jun 23, 2016

Spring Integration and ActiveMQ JMS message producer and consumer

Following what we want to achieve.


Following is configuration. Note that we need to set reply channel to nullChannel if we do not want to process reply coming from JMS queue after processing. If not set it will throw and Exception. So keeping that in mind, following will be the configuration.

<?xml version="1.0" encoding="UTF-8"?>
<beans xmlns="http://www.springframework.org/schema/beans"
xmlns:xsi="http://www.w3.org/2001/XMLSchema-instance" xmlns:int="http://www.springframework.org/schema/integration"
xmlns:int-jms="http://www.springframework.org/schema/integration/jms"
xsi:schemaLocation="http://www.springframework.org/schema/beans http://www.springframework.org/schema/beans/spring-beans.xsd
http://www.springframework.org/schema/integration http://www.springframework.org/schema/integration/spring-integration.xsd
http://www.springframework.org/schema/integration/jms http://www.springframework.org/schema/integration/jms/spring-integration-jms.xsd">
<!-- JMS Message Processor (Start) -->
<int:channel id="xmerChannel" />
<int:channel id="svcActChannel" />
<int-jms:inbound-gateway request-channel="xmerChannel" connection-factory="connectionFactory" request-destination="requestQueue" default-reply-destination="responseQueue" acknowledge="transacted"/>
<int:header-enricher input-channel="xmerChannel"
output-channel="svcActChannel">
<int:header name="lang" value="en" />
</int:header-enricher>
<int:service-activator id="printSvcActivator" ref="msgPrintBean"
method="printOutput" input-channel="svcActChannel"/>
<!-- JMS Message Producer (Start) -->
<int:channel id="reqChannel" />
<int:channel id="toJMSChannel" />
<int:gateway service-interface="com.techrefresh.spring.integration.gateway.JMSGateway" id="jmsGW" default-request-channel="reqChannel" />
<int:service-activator id="jmsMsgChecker" ref="msgPrintBean"
method="addTimeStampToMsg" input-channel="reqChannel" output-channel="toJMSChannel"/>
<int-jms:outbound-gateway request-channel="toJMSChannel" connection-factory="connectionFactory" request-destination="requestQueue" reply-channel="nullChannel"/>
<!-- JMS Message Producer (End) -->
<bean id="msgPrintBean" class="com.techrefresh.spring.integration.bean.UtilBean" />
<bean id="requestQueue" class="org.apache.activemq.command.ActiveMQQueue">
<constructor-arg value="request-queue" />
</bean>
<bean id="responseQueue" class="org.apache.activemq.command.ActiveMQQueue">
<constructor-arg value="response-queue" />
</bean>
<bean id="connectionFactory"
class="org.springframework.jms.connection.CachingConnectionFactory">
<property name="targetConnectionFactory">
<bean class="org.apache.activemq.ActiveMQConnectionFactory">
<property name="brokerURL" value="tcp://localhost:61616" />
</bean>
</property>
<property name="sessionCacheSize" value="10" />
</bean>
<int:poller fixed-rate="1000" id="pollermain"></int:poller>
</beans>

We changed our configuration class little bit to print different messages
  1. Just before sending to activeMQ we append timestamp
  2. Once received on Queue we simply print it.

So following will be the util class.

package com.techrefresh.spring.integration.bean;
import java.text.SimpleDateFormat;
import java.util.Date;
import org.slf4j.Logger;
import org.slf4j.LoggerFactory;
import com.techrefresh.spring.integration.pojo.TwitBean;
public class UtilBean {
private static final SimpleDateFormat frmt = new SimpleDateFormat("dd-MMM-yyyy hh:mm:ss:SSS");
private static final Logger logger = LoggerFactory.getLogger(UtilBean.class);
public void printOutput(TwitBean msg){
logger.info("Bean received from {} in {}::: {}",msg.getName(),msg.getLanguage(),msg.getMessage());
}
public String printOutput(String msg){
logger.info("Simple message {} will convert to uppercase",msg);
return msg.toUpperCase();
}
public String addTimeStampToMsg(String msg){
logger.info("Simple message {} will add TS {}",msg,frmt.format(new Date()));
return msg+" @ "+frmt.format(new Date());
}
}
view raw UtilBean.java hosted with ❤ by GitHub

Following is new interface just to use it for entry gateway.

package com.techrefresh.spring.integration.gateway;
public interface JMSGateway {
public void sendMessage(String msg);
}
view raw JMSGateway.java hosted with ❤ by GitHub
Following is screen when we run it from Eclipse
2016-06-23 09:32:39 INFO  UtilBean:22 - Simple message This is test message will add TS 23-Jun-2016 09:32:39:499
2016-06-23 09:32:39 INFO  UtilBean:18 - Simple message This is test message @ 23-Jun-2016 09:32:39:502 will convert to uppercase


Jun 22, 2016

ActiveMQ with Spring Integration inbound-gateway

In this example we want to read one message froom one queue (request-queue) put some header on it and send uppercase response to reply queue (response-queue). Following is Integration diagram.

Create two queues from ActiveMQ web console.
Following is configuration file

<?xml version="1.0" encoding="UTF-8"?>
<beans xmlns="http://www.springframework.org/schema/beans"
xmlns:xsi="http://www.w3.org/2001/XMLSchema-instance" xmlns:int="http://www.springframework.org/schema/integration"
xmlns:int-jms="http://www.springframework.org/schema/integration/jms"
xsi:schemaLocation="http://www.springframework.org/schema/beans http://www.springframework.org/schema/beans/spring-beans.xsd
http://www.springframework.org/schema/integration http://www.springframework.org/schema/integration/spring-integration.xsd
http://www.springframework.org/schema/integration/jms http://www.springframework.org/schema/integration/jms/spring-integration-jms.xsd">
<!-- Loan Request comes from MQ message (temporary direct message) -->
<int:channel id="xmerChannel" />
<int:channel id="svcActChannel" />
<int-jms:inbound-gateway request-channel="xmerChannel" connection-factory="connectionFactory" request-destination="requestQueue" default-reply-destination="responseQueue" acknowledge="transacted"/>
<int:header-enricher input-channel="xmerChannel"
output-channel="svcActChannel">
<int:header name="lang" value="en" />
</int:header-enricher>
<int:service-activator id="printSvcActivator" ref="msgPrintBean"
method="printOutput" input-channel="svcActChannel"/>
<bean id="msgPrintBean" class="com.techrefresh.spring.integration.bean.UtilBean" />
<bean id="requestQueue" class="org.apache.activemq.command.ActiveMQQueue">
<constructor-arg value="request-queue" />
</bean>
<bean id="responseQueue" class="org.apache.activemq.command.ActiveMQQueue">
<constructor-arg value="response-queue" />
</bean>
<bean id="connectionFactory"
class="org.springframework.jms.connection.CachingConnectionFactory">
<property name="targetConnectionFactory">
<bean class="org.apache.activemq.ActiveMQConnectionFactory">
<property name="brokerURL" value="tcp://localhost:61616" />
</bean>
</property>
<property name="sessionCacheSize" value="10" />
</bean>
<int:poller fixed-rate="1000" id="pollermain"></int:poller>
</beans>


Folloiwng is util bean.

package com.techrefresh.spring.integration.bean;
import org.slf4j.Logger;
import org.slf4j.LoggerFactory;
public class UtilBean {
private static final Logger logger = LoggerFactory.getLogger(UtilBean.class);
public String printOutput(String msg){
logger.info("Simple message {}",msg);
return msg.toUpperCase();
}
}
view raw UtilBean.java hosted with ❤ by GitHub

Now send message from activemq web console.


Following is what you receive on response channel.


Jun 21, 2016

Using Spring Integration example for Twitter stream Reading

Following is what we want to achieve.


Spring configuration file.

<?xml version="1.0" encoding="UTF-8"?>
<beans xmlns="http://www.springframework.org/schema/beans"
xmlns:xsi="http://www.w3.org/2001/XMLSchema-instance" xmlns:int="http://www.springframework.org/schema/integration"
xmlns:int-jms="http://www.springframework.org/schema/integration/jms"
xsi:schemaLocation="http://www.springframework.org/schema/beans http://www.springframework.org/schema/beans/spring-beans.xsd
http://www.springframework.org/schema/integration http://www.springframework.org/schema/integration/spring-integration.xsd
http://www.springframework.org/schema/integration/jms http://www.springframework.org/schema/integration/jms/spring-integration-jms.xsd">
<!-- Loan Request comes from MQ message (temporary direct message) -->
<int:channel id="xmerChannel" />
<int:channel id="langRouterChannel" />
<int:channel id="engChannel" />
<int:channel id="espChannel" />
<int:channel id="frcChannel" />
<int:gateway id="entryPoint" default-request-channel="xmerChannel"
service-interface="com.techrefresh.spring.integration.gateway.TwitGateway" />
<int:header-enricher input-channel="xmerChannel" output-channel="langRouterChannel">
<int:header name="name" expression="payload.name"/>
<int:header name="lang" expression="payload.language"/>
</int:header-enricher>
<int:header-value-router header-name="lang" input-channel="langRouterChannel">
<int:mapping value="en" channel="engChannel"/>
<int:mapping value="es" channel="espChannel"/>
<int:mapping value="fr" channel="frcChannel"/>
</int:header-value-router>
<int:service-activator id="enOutSvc" ref="msgPrintBean" method="printOutput" input-channel="engChannel" requires-reply="false" />
<int:service-activator id="esOutSvc" ref="msgPrintBean" method="printOutput" input-channel="espChannel" requires-reply="false" />
<int:service-activator id="frOutSvc" ref="msgPrintBean" method="printOutput" input-channel="frcChannel" requires-reply="false" />
<bean id="msgPrintBean"
class="com.techrefresh.spring.integration.bean.UtilBean" />
</beans>


Main class for reading twits and passing it for processing. Note that information like consumer key, consumer secret, application secret key and application secret need to be copied from your twitter developer account.

package com.techrefresh.spring.integration.twitter;
import org.slf4j.Logger;
import org.slf4j.LoggerFactory;
import org.springframework.context.ApplicationContext;
import org.springframework.context.support.ClassPathXmlApplicationContext;
import twitter4j.FilterQuery;
import twitter4j.StallWarning;
import twitter4j.Status;
import twitter4j.StatusDeletionNotice;
import twitter4j.StatusListener;
import twitter4j.TwitterStream;
import twitter4j.TwitterStreamFactory;
import twitter4j.conf.ConfigurationBuilder;
import com.techrefresh.spring.integration.gateway.TwitGateway;
import com.techrefresh.spring.integration.pojo.TwitBean;
public class StreamReader {
private static Logger logger = LoggerFactory.getLogger(StreamReader.class);
private static TwitterStream stream = null;
public static void main(String[] args) {
ApplicationContext ctx = new ClassPathXmlApplicationContext("spring-int-context.xml");
final TwitGateway gw = (TwitGateway) ctx.getBean("entryPoint");
init();
StatusListener listener = new StatusListener() {
public void onException(Exception arg0) {
}
public void onDeletionNotice(StatusDeletionNotice arg0) {
}
public void onScrubGeo(long arg0, long arg1) {
}
public void onStallWarning(StallWarning arg0) {
}
public void onStatus(Status status) {
TwitBean bean = new TwitBean();
bean.setName(status.getUser().getName());
bean.setMessage(status.getText());
bean.setLanguage(status.getLang());
gw.parseTwit(bean);
}
public void onTrackLimitationNotice(int arg0) {
}
};
FilterQuery qry = new FilterQuery();
String[] keywords = { "Hong Kong"};
qry.track(keywords);
stream.addListener(listener);
stream.filter(qry);
}
private static void init(){
logger.info("Initializing Twitter Stream");
ConfigurationBuilder confBuilder = new ConfigurationBuilder();
confBuilder.setOAuthConsumerKey(TwitterConstants.CONSUMER_KEY);
confBuilder.setOAuthConsumerSecret(TwitterConstants.CONSUMER_SECRET);
confBuilder.setOAuthAccessToken(TwitterConstants.ACCESS_TOKEN_KEY);
confBuilder.setOAuthAccessTokenSecret(TwitterConstants.ACCESS_TOKEN_SECRET);
stream = new TwitterStreamFactory(confBuilder.build()).getInstance();
}
}

Pojo class to store twit information.

package com.techrefresh.spring.integration.pojo;
public class TwitBean {
private String name;
private String message;
private String language;
public String getLanguage() {
return language;
}
public void setLanguage(String language) {
this.language = language;
}
public String getName() {
return name;
}
public void setName(String name) {
this.name = name;
}
public String getMessage() {
return message;
}
public void setMessage(String message) {
this.message = message;
}
}
view raw TwitBean.java hosted with ❤ by GitHub

Gateway interface

package com.techrefresh.spring.integration.gateway;
import com.techrefresh.spring.integration.pojo.TwitBean;
public interface TwitGateway {
public void parseTwit(TwitBean bean);
}

Utility Bean class.

package com.techrefresh.spring.integration.bean;
import org.slf4j.Logger;
import org.slf4j.LoggerFactory;
import com.techrefresh.spring.integration.pojo.TwitBean;
public class UtilBean {
private static final Logger logger = LoggerFactory.getLogger(UtilBean.class);
public void printOutput(TwitBean msg){
logger.info("Bean received from {} in {}::: {}",msg.getName(),msg.getLanguage(),msg.getMessage());
}
}
view raw UtilBean.java hosted with ❤ by GitHub

Jun 13, 2016

Running first Apache Spark Project

Load data from CSV file to train model
Based on learning use trained model to predict the output.
Data used here is from https://www.kaggle.com/c/titanic

For running Spark from Eclipse it is required that we set following VM argument.
-Xmx512m


Following is source code.
package com.spark.titanic.main;
import java.util.HashMap;
import org.apache.spark.SparkConf;
import org.apache.spark.api.java.JavaRDD;
import org.apache.spark.api.java.JavaSparkContext;
import org.apache.spark.api.java.function.Function;
import org.apache.spark.api.java.function.VoidFunction;
import org.apache.spark.mllib.linalg.Vectors;
import org.apache.spark.mllib.regression.LabeledPoint;
import org.apache.spark.mllib.tree.RandomForest;
import org.apache.spark.mllib.tree.model.RandomForestModel;
import org.apache.spark.sql.DataFrame;
import org.apache.spark.sql.SQLContext;
import org.slf4j.Logger;
import org.slf4j.LoggerFactory;
import scala.Tuple2;
import com.spark.titanic.bean.PessangerBean;
import com.spark.titanic.bean.PessangerBean.Embark;
import com.spark.titanic.bean.PessangerBean.Sex;
public class TitanicMain {
private static final Logger logger = LoggerFactory
.getLogger(TitanicMain.class);
private static JavaSparkContext sc;
private static SQLContext sqlCtx;
public static void main(String[] args) {
System.setProperty("hadoop.home.dir",
"D:/sw/hadoop/hadoop-common-2.2.0-bin-master/");
// Define a configuration to use to interact with Spark
SparkConf conf = new SparkConf().setMaster("local").setAppName(
"Titanic Survival Analytics App");
// Create a Java version of the Spark Context from the configuration
sc = new JavaSparkContext(conf);
loadTrainingData();
}
private static void loadTrainingData() {
JavaRDD<LabeledPoint> trainingRDD = sc
.textFile("file://D:/tech/data/titanic/train.csv")
.filter(new Function<String, Boolean>() {
@Override
public Boolean call(String line) throws Exception {
return line.charAt(0) != 'P';
}
}).map(new Function<String, LabeledPoint>() {
@Override
public LabeledPoint call(String line) throws Exception {
String[] fields = line.split(
",(?=([^\"]*\"[^\"]*\")*[^\"]*$)", -1);
// logger.info("{} {} {}",fields[1],fields[2],fields[5]);
LabeledPoint point = new LabeledPoint(Double
.valueOf(fields[1]), Vectors.dense(Double
.valueOf(fields[2]), Double
.valueOf(fields[5] == null
|| "".equals(fields[5].trim()) ? "0"
: fields[5]),
Double.valueOf(fields[6]), Double
.valueOf(fields[7]), Double
.valueOf(fields[9]), "male"
.equalsIgnoreCase(fields[4]) ? 1d : 0d));
return point;
}
});
Integer numClasses = 2;
HashMap<Integer, Integer> categoricalFeaturesInfo = new HashMap<Integer, Integer>();
Integer numTrees = 3; // Use more in practice.
String featureSubsetStrategy = "auto"; // Let the algorithm choose.
String impurity = "gini";
Integer maxDepth = 5;
Integer maxBins = 32;
Integer seed = 12345;
double split[] = { 0.7, 0.3 };
logger.info("No of splits {}", split.length);
JavaRDD<LabeledPoint> splits[] = trainingRDD.randomSplit(split);
logger.info("Count in splits is {} {}", splits[0].count(),
splits[1].count());
final RandomForestModel model = RandomForest.trainClassifier(
trainingRDD, numClasses, categoricalFeaturesInfo, numTrees,
featureSubsetStrategy, impurity, maxDepth, maxBins, seed);
JavaRDD<LabeledPoint> testData = sc
.textFile("file://D:/tech/data/titanic/test.csv")
.filter(new Function<String, Boolean>() {
@Override
public Boolean call(String line) throws Exception {
return line.charAt(0) != 'P';
}
}).map(new Function<String, LabeledPoint>() {
@Override
public LabeledPoint call(String line) throws Exception {
String[] fields = line.split(
",(?=([^\"]*\"[^\"]*\")*[^\"]*$)", -1);
// logger.info("{} {} {}",fields[1],fields[2],fields[5]);
LabeledPoint point = new LabeledPoint(Double
.valueOf(fields[0]), Vectors.dense(Double
.valueOf(fields[1]), // pClass
Double.valueOf(fields[4] == null
|| "".equals(fields[5].trim()) ? "0"
: fields[5]),// Age
Double.valueOf(fields[5]),// SibSp
Double.valueOf(fields[6]),// pArch
Double.valueOf(fields[8] == null
|| "".equals(fields[8].trim()) ? "0"
: fields[8]),// Fare
"male".equalsIgnoreCase(fields[4]) ? 1d : 0d));
return point;
}
});
JavaRDD<Tuple2<Double, Double>> testDataPred = testData
.map(new Function<LabeledPoint, Tuple2<Double, Double>>() {
@Override
public Tuple2<Double, Double> call(LabeledPoint point)
throws Exception {
Tuple2<Double, Double> tuple = new Tuple2<Double, Double>(
point.label(), model.predict(point.features()));
return tuple;
}
});
testDataPred.foreach(new VoidFunction<Tuple2<Double, Double>>() {
@Override
public void call(Tuple2<Double, Double> arg0) throws Exception {
logger.info("{}\t{}", arg0._1, arg0._2);
}
});
}
}


Note that if Apache Hadoop is not installed on local machine then just download binaries and set system property hadoop.home.dir. If you are running stand alone code and do not want to hardcode set the proprety using -D option.

Some important tips are from Kaggle forums.